

Few travel tools are as useful and versatile as the Google Maps Trip Planner.
Whether you want to create a detailed road trip itinerary, share trip plans easily between friends, or have a basic idea of what sites you want to see on your trip, the Google Maps Trip Planner can do it all. This guide will let you know who the trip planner is perfect for, what the best features are, and how to use this free trip planning resource to the fullest!
Some of these links are affiliate links. This means if you make a purchase through that link, I receive a small commission at no extra cost to you. Read my full disclosure!
Who is Google Maps Trip Planner Most Useful For?
The best thing about Google Maps Trip Planner is that it is not just a road trip planning tool. It can be used in a variety of ways that you may not think of at first.
Road Trippers
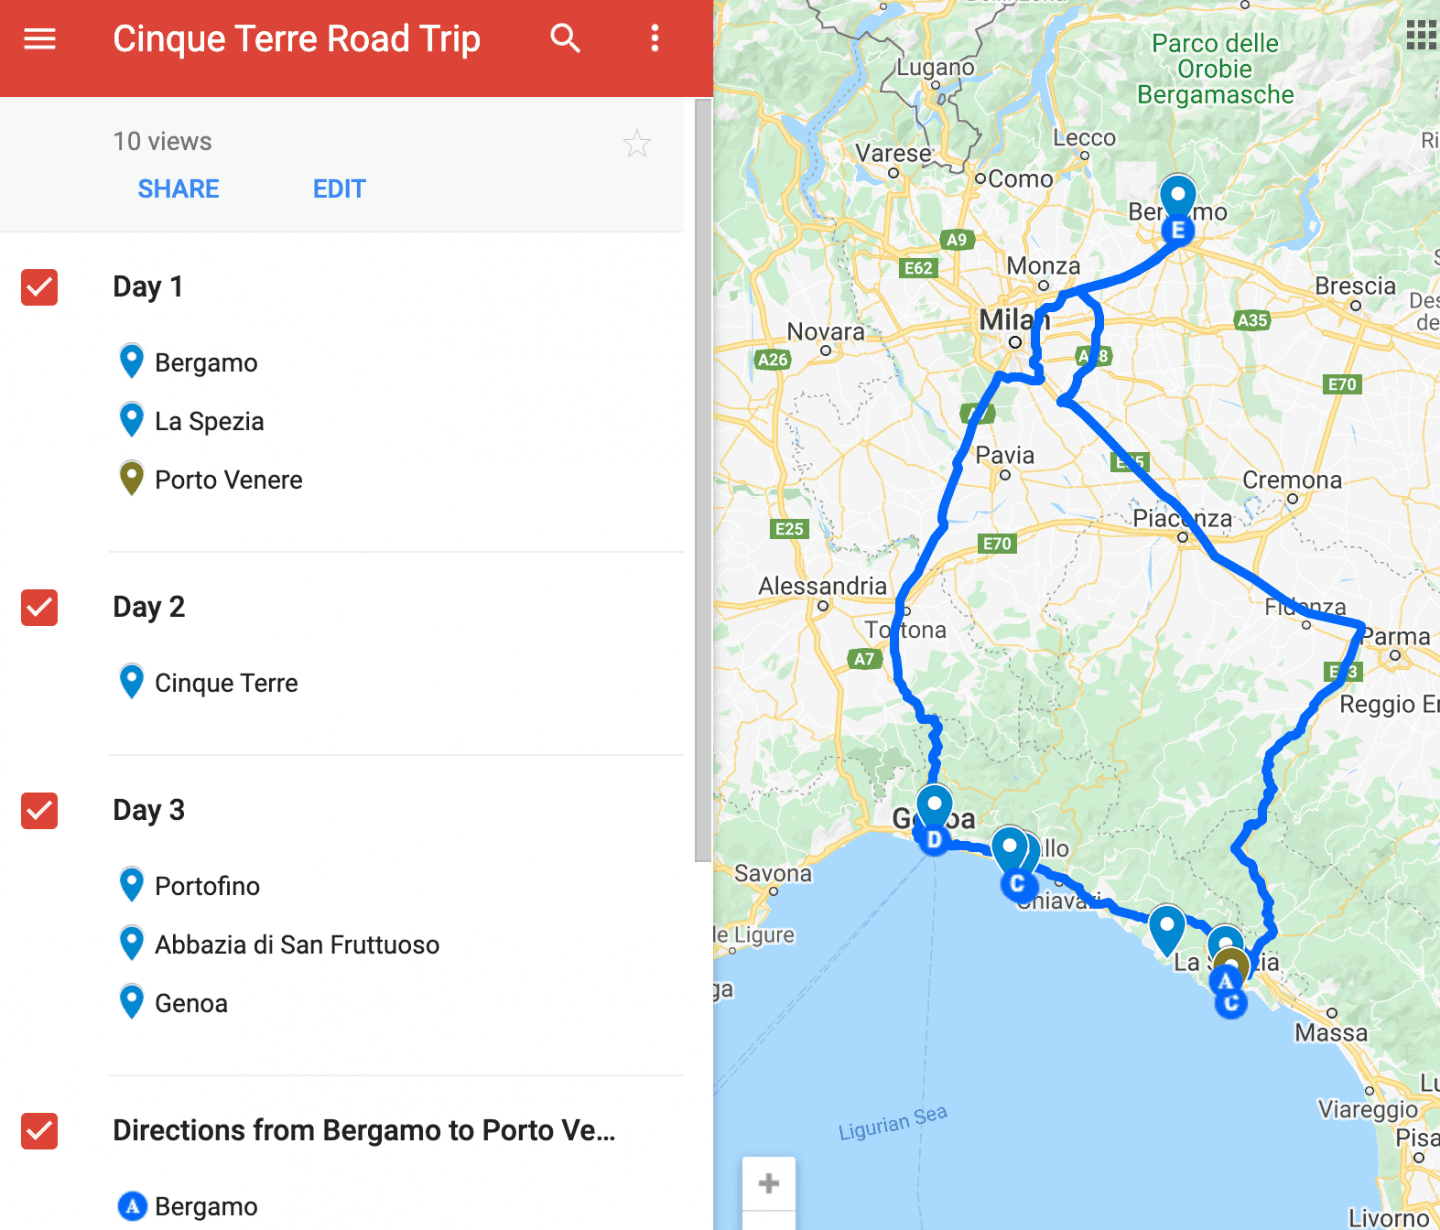
Let’s get the obvious one out of the way first. Planning a road trip with Google Maps Trip Planner is so easy. We’ll dive in-depth on specific features later in this post, but some of the best things about Trip Planner for creating a road trip itinerary are:
- the ability to plan out each day of your road trip.
- automatically sync your map to the Google Maps app.
- know exact distances and real-time travel updates to use your time in the most efficient way possible.
Discover exactly how to plan the perfect road trip budget with tools like Trip Planner and money-saving tips!
Group Travelers
Anyone trying to coordinate a trip with a group of travelers knows the struggles of getting everyone on the same page. Everyone has their own priorities of what they want to see, how much they are willing to spend, etc. Google Maps Trip Planner is perfect for group travelers because:
- you can share your itinerary easily with anyone you choose.
- use color-coding to attend to each traveler’s needs.
- use directions and distances to determine what locations are too out of the way.
Travel Photographers, Bloggers & Content Creators
Creatives like travel photographers, content creators and bloggers should all be using Google Maps Trip Planner! From my own personal experience, I do lots of research on locations I want to photograph before visiting a new place.
Then, what do you do with the information? After I’ve come up with my list of must-shoot places, I go to Google Maps Trip Planner and add a layer to my map that’s solely photo locations.
Then I can see if there are any too far out of the way of my itinerary or, also a possibility, some that can’t be reached by car.
You may think of Trip Planner as just a tool for planning road trips, but it’s actually an incredibly useful organizational tool for someone like me as a travel blogger to plan out where and when I will shoot new content!
Solo Travelers
Solo road trip? It’s a thing – and all solo travelers should take advantage of Trip Planner!
The number one reason Trip Planner is great for solo travelers is because it’s a safety tool. By putting your itinerary all in one place and easily be able to share it with family and friends, they can know where you will be on what days of your trip. This is one of my top tips for solo female travelers, especially!
Why Use Google Maps Trip Planner?
It’s Free, With No Strings Attached


The best part is that this trip planner is completely free! No subscription or In-App purchases, just a helpful web tool that puts the power of making your own itinerary on an actual map in your hands.
The only thing you need is a Gmail account with which you’ll sign in and then be able to create a map. But no worries, you won’t get any extra annoying emails sent to your inbox for using Trip Planner.
When you go to the site, you’ll sign in at the top right corner of the web page. If you’re already logged into Gmail on your computer, you’ll already be signed in!
Maps Automatically Back Up To Your Drive
Once you’re signed into your Gmail account, your maps become automatically connected to your Google Drive. No need to worry about losing progress while making your map.
Always double check in the upper lefthand corner that it says “All Changes Saved To Drive” before closing your map tab, otherwise you will lose whatever work you’ve done in that session.
It’s Compatible Across Devices

Once you make your map and it’s in your Google Drive, it becomes compatible across devices within Google Maps.
You can open Google Maps on your phone and open your map to easily access directions and reference your location markers on the go.
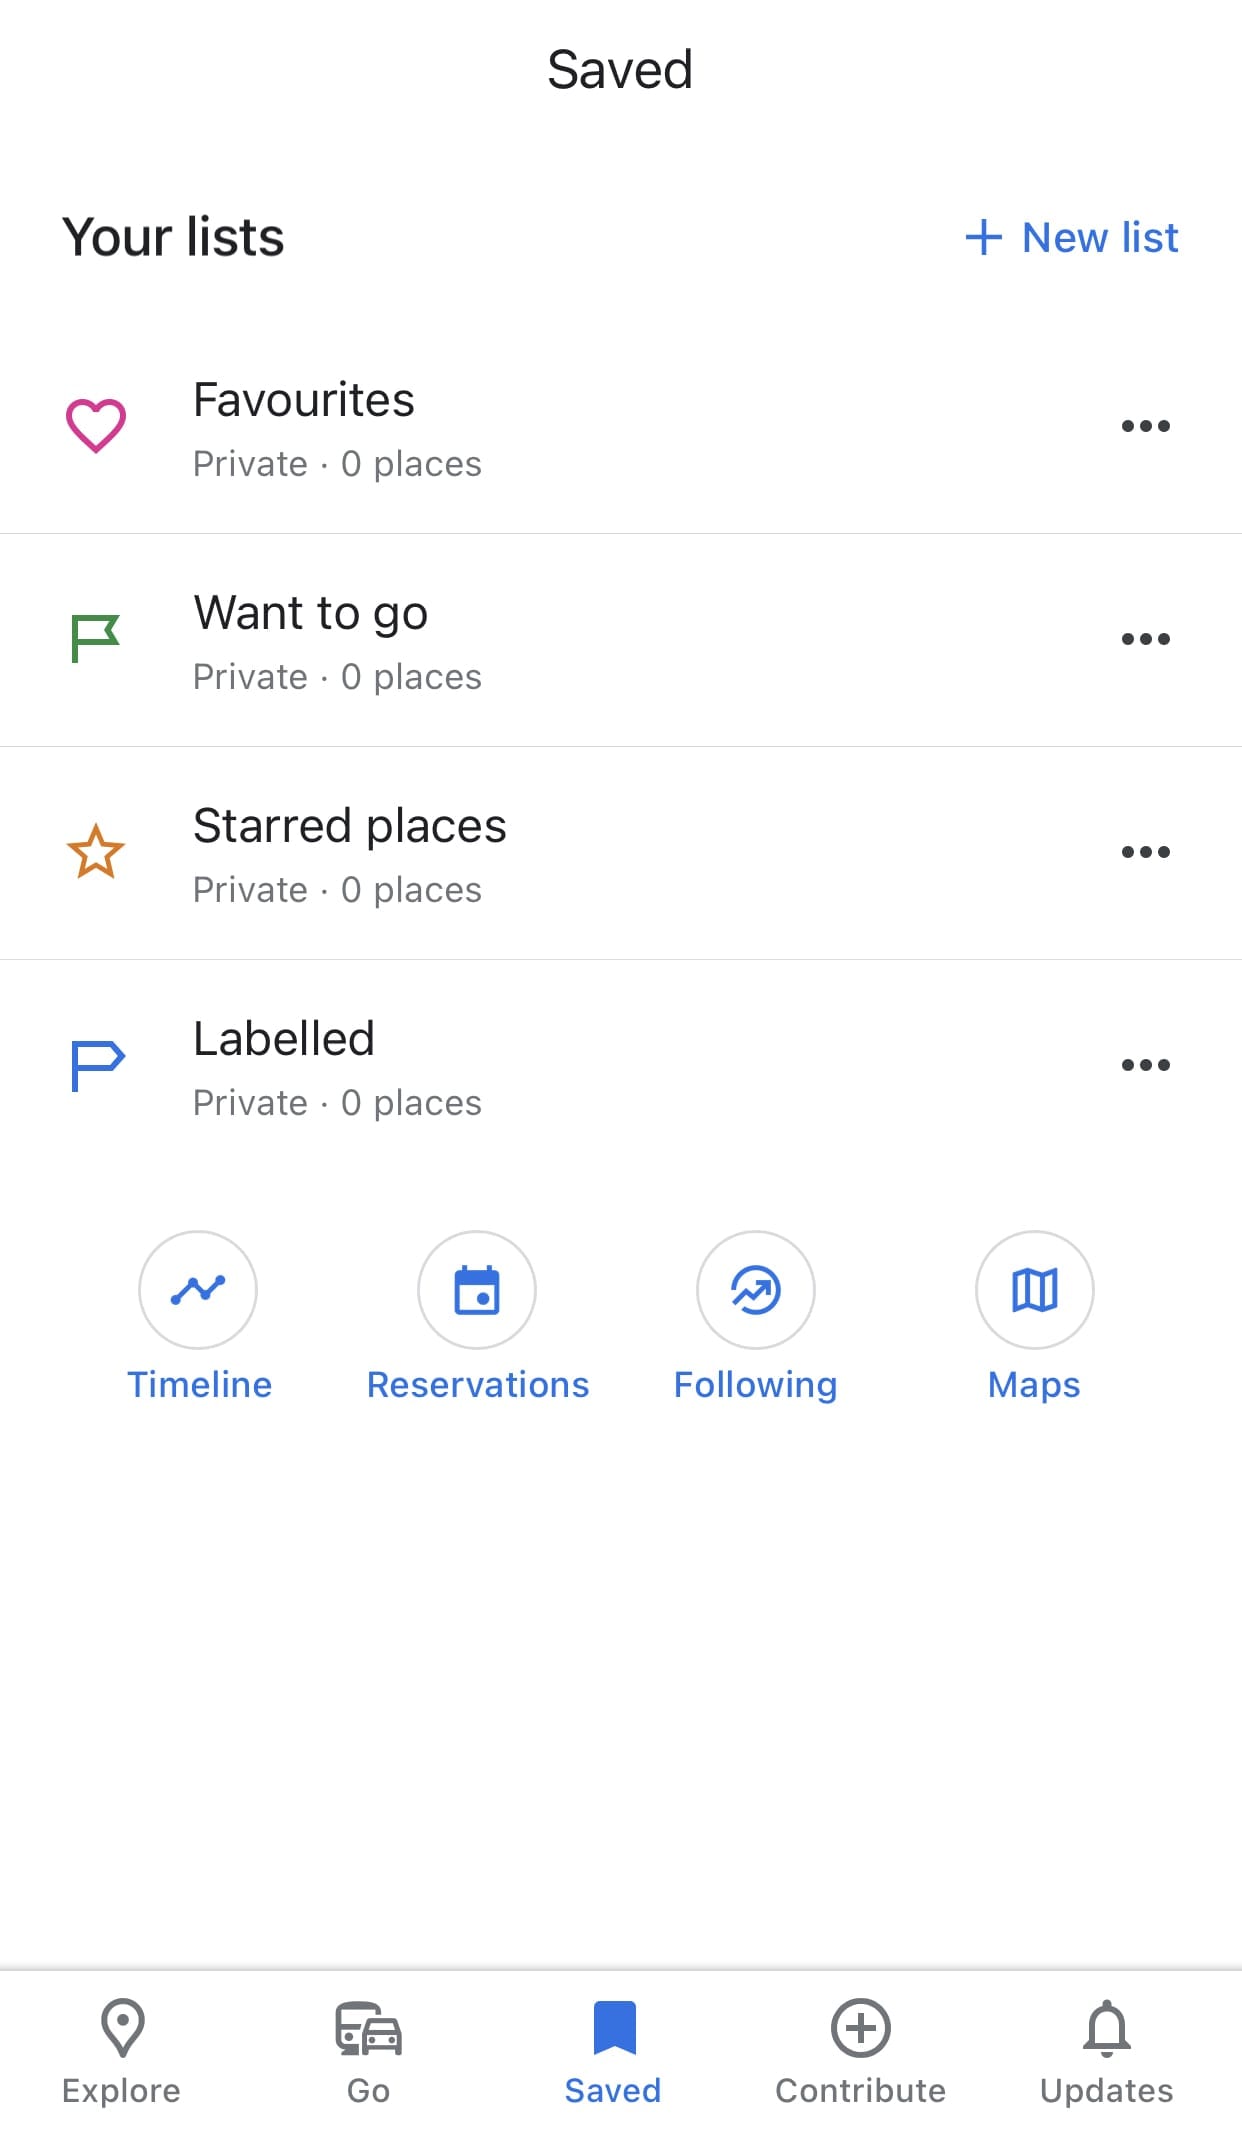
Pro Tip: If your map doesn’t automatically pop up when you open the app, go to the Saved tab in the middle of the menu at the bottom. You’ll see under “Your Lists” a row of circular icons. Click on the icon that says Maps and you’ll have access to every map you’ve created with Google Maps Trip Planner!
You Can Easily Share Your Itinerary With Others
Whether it’s for safety as a solo traveler, coordinating a group of trip-goers, or creating an itinerary for your blog followers, Google Maps Trip Planner makes it super simple to share your map.
At the end of this post, you’ll find the exact instructions for sharing!
Have Everything In One Place
I know when I’m trip planning, you’ll see me writing lists in a million different notebooks as new thoughts enter my mind – where am I going to find parking, I want to add this place to our itinerary, here’s options for restaurants, etc.
Google Maps Trip Planner can organize all of that information for me and save it in one place so trip planning is more organized and actually useful, in comparison to saving information in tons of different places and trying to piece it together as you are traveling.
Travel Bloggers & Creators Can Create Sample Itineraries To Share With Their Audiences

I mentioned this very briefly when it came to sharing maps, but this creative idea deserves its own category. If you don’t want to use the Google Maps plugin as a travel blogger (because it costs money) consider creating an itinerary for your followers to be inspired by on Trip Planner.
With the layering feature, you can create multiple sample itineraries within one map for your followers to get even more use and inspiration out of your blog and resources.
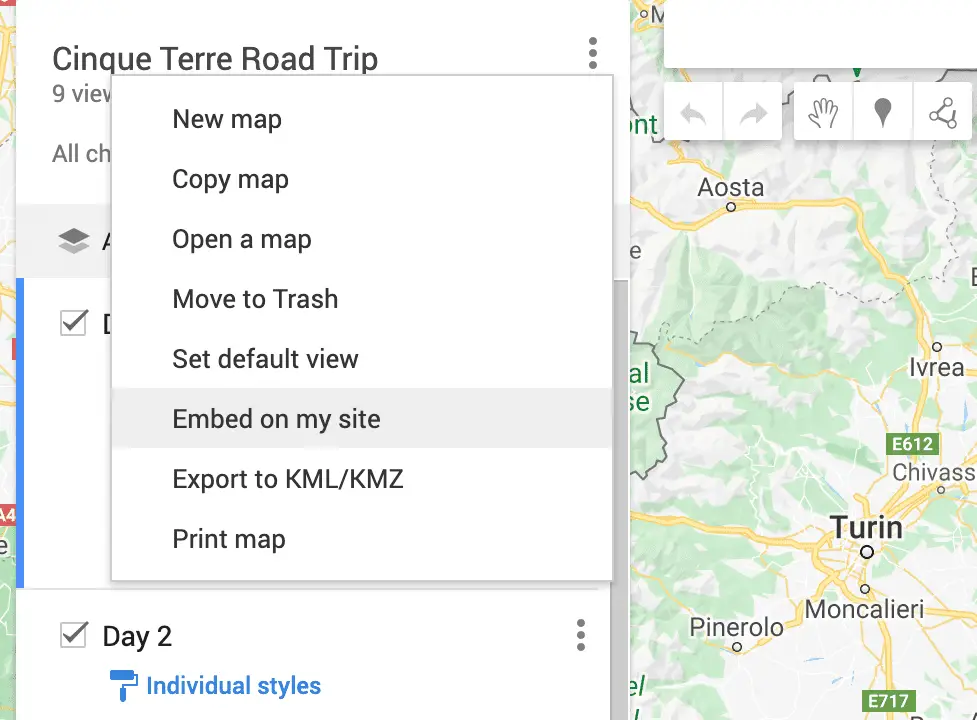
To add a map to your website, go to the upper lefthand corner next to map name and click the three dotes. Then click “Embed on my site” and copy the generated code into your post!
Amazing Features to Take Advantage of in Google Maps Trip Planner
Layering Your Map

The most useful feature in Google Maps Trip Planner is layering. Adding layers to your map has so many pros during the trip planning process.
Firstly, while you’re planning and trying to determine how much you can see and do with your time, you can create sample itineraries within your one map by using different layers. While you brainstorm, you can visually see all of your options in one place and determine which routes work and which ones don’t.
Layers also allow you to plan your trip in-depth. You can make a layer for each day of your trip, each hour, each week – however specific or general you want to be, you can be!
Layers can also be used to differentiate between different traveler’s wants and needs. If you’re planning a group trip, each traveler can add their own layer of places they want to go. Have every layer visible and you can easily determine which places are too far out of the way from your route. Now, you can streamline your itinerary without argument.
There are so many ways to use the layers to make your trip planning creative and customizable to your needs!
Fun Tip: You can select the “Base Map” to be a different setting, for example if you want your map to be satellite or black and white!
Color-Coding Location Markers
One of the coolest things you can do on top of layering to make your map super detailed and specific is color coding your location markers.
Assigning location pins different colors can help you categorize what each location is without having to constantly click between them. For example, yellow markers could be Day 1, red markers Day 2, etc. Or you can add a category like “places to take pictures” that aren’t necessarily a part of your driving route.
For example, I was photographing certain locations for a company in Zurich, Switzerland a few weeks ago. I created a layer in my road trip map of only blue markers that were the locations I was supposed to shoot. I wasn’t driving to these locations, so it helped me to differentiate my locations I was photographing between my actual road trip route!
Ideas for what kinds of parameters you can use for different colored markers are:
- Restaurants
- Different days of your trip
- Picture spots
- Places each traveler in your group wants to visit
- Places that are a priority versus places you will visit if you have the time
- Activities & Tours
Adding Symbols to Location Markers
I’m sure it won’t surprise you to know that you can get even more specific with your trip planning. If color coding your markers isn’t enough for you, try adding a symbol to them.
You can add a symbol for gas stations, parking, your accommodation, restaurants, places you want to take pictures, – almost anything you can think of!
You can also add a short description in the text box pop-up when you click your location pin with whatever information you may want to note!
Add Directions Between Locations To Know Exact Travel Times

You can add directions between each day’s location or the entire road trip journey as a whole to know exactly how much time you’ll spend driving.
Often when we start planning a road trip, we want to see as much as possible and get a little in over our heads as to how much time we’ll really have to get around.
Places can sometimes look a lot closer on a map than they are by car. By seeing the travel times all in one place, you can easily weed out which spots don’t fit in your itinerary.
Use It Along Via Michelin to Estimate Fuel Costs On Your Road Trip

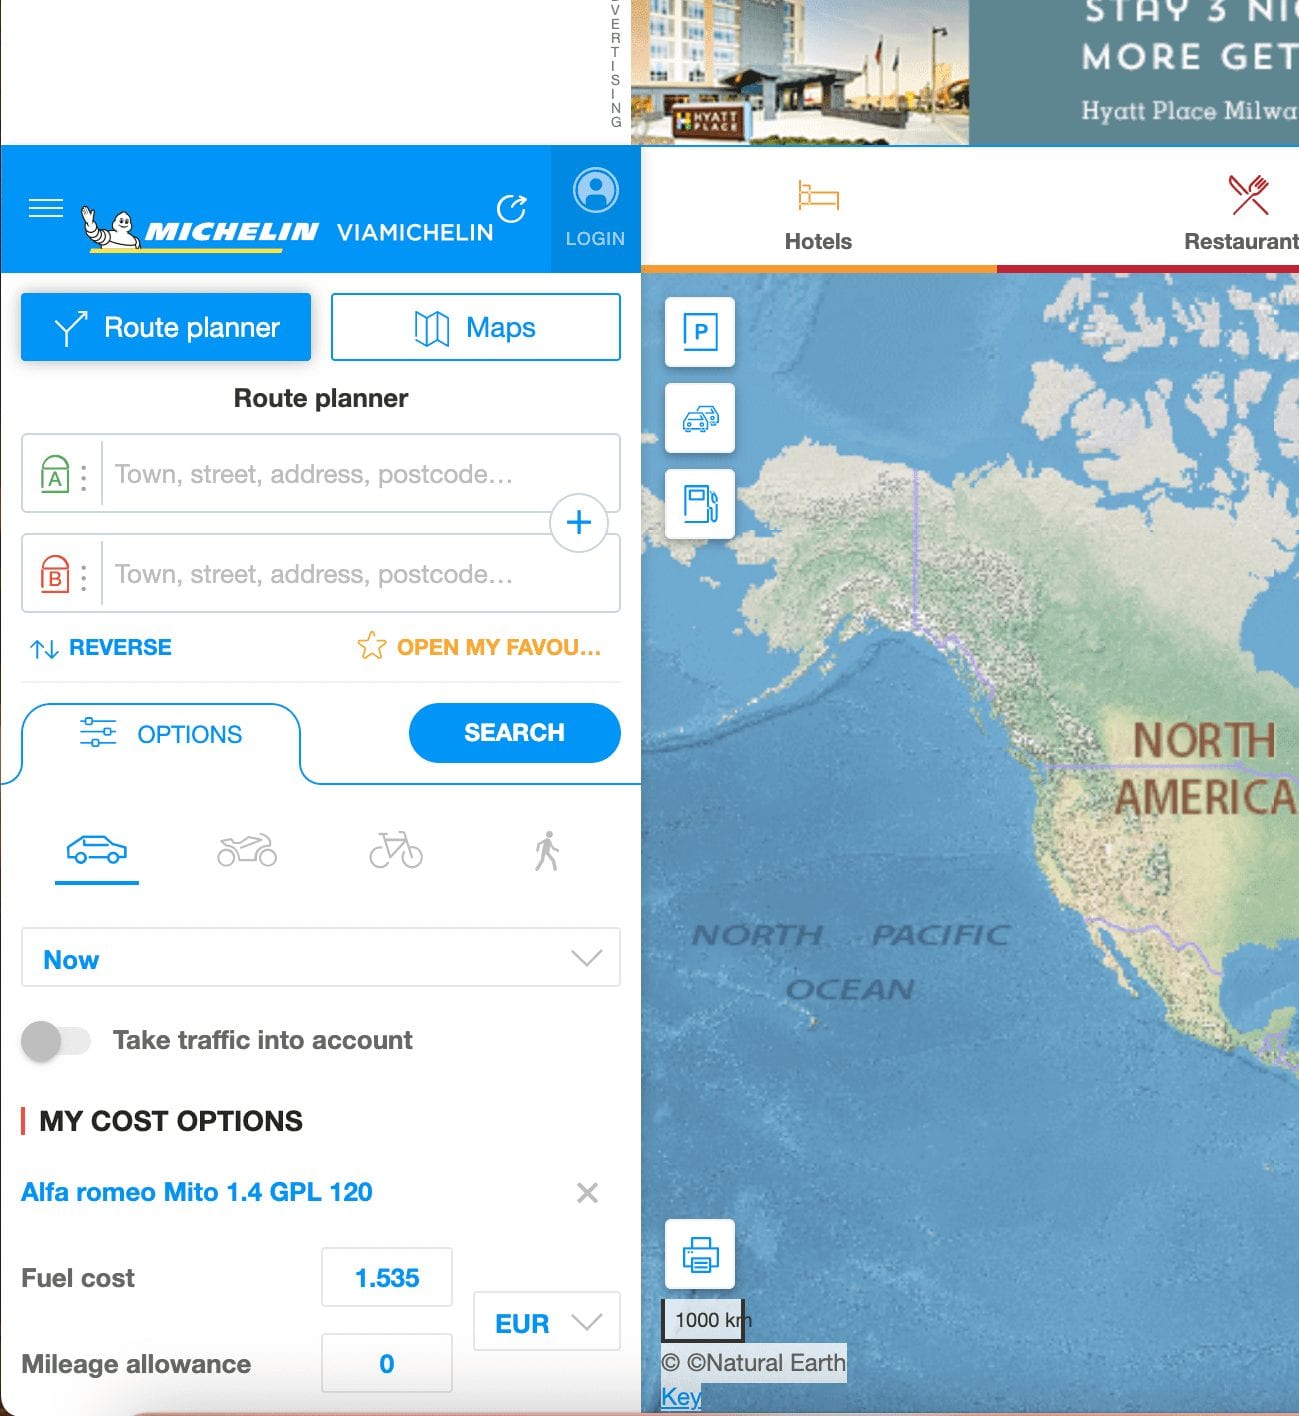
The one thing Google Maps Trip Planner doesn’t do is factor in fuel expenditure and cost. To rectify this problem and have the most detailed plan for your road trip and budget, use the trip planner in conjunction with ViaMichelin.
First, input your itinerary that you refined in Google Maps Trip Planner into ViaMichelin’s Route Planner. Then, enter the information of the make and model of your car.
ViaMichelin then takes all this information as well as insights about your route (local gas prices, toll costs, etc.) and gives you an accurate estimation of how much you’ll spend on your trip in fuel and tolls.
With these two tools working together, you’ll be the best prepared to use your budget and time wisely!
How to Create Your First Map in Google Maps Trip Planner
Google Maps Trip Planner becomes a very intuitive tool after you give it a try. It looks quite intimidating at first and not user-friendly, but once you start creating a map and clicking around to get to know the interface, you can catch one quickly and eventually master mapmaking.
This easy-to-follow guide will help you easily create a map in Google Maps Trip Planner for the first time.
Navigation Panel
Everything you need to make a map is in the white navigation panel on the lefthand side of your screen. At the top of your screen is a small search bar, where you can type in specific locations you want to add to your map!
Some tools below the search bar that I won’t write about later are:
- Undo & Redo Buttons – Denoted by an arrow going left and another going right
- Select Tool – Denoted by a handprint and useful for moving around the map without creating new markers
- Draw a Line Tool – Denoted by three points connected by a line
- Ruler Tool – Used for measuring distances
Name Your Map & Add Location Markers

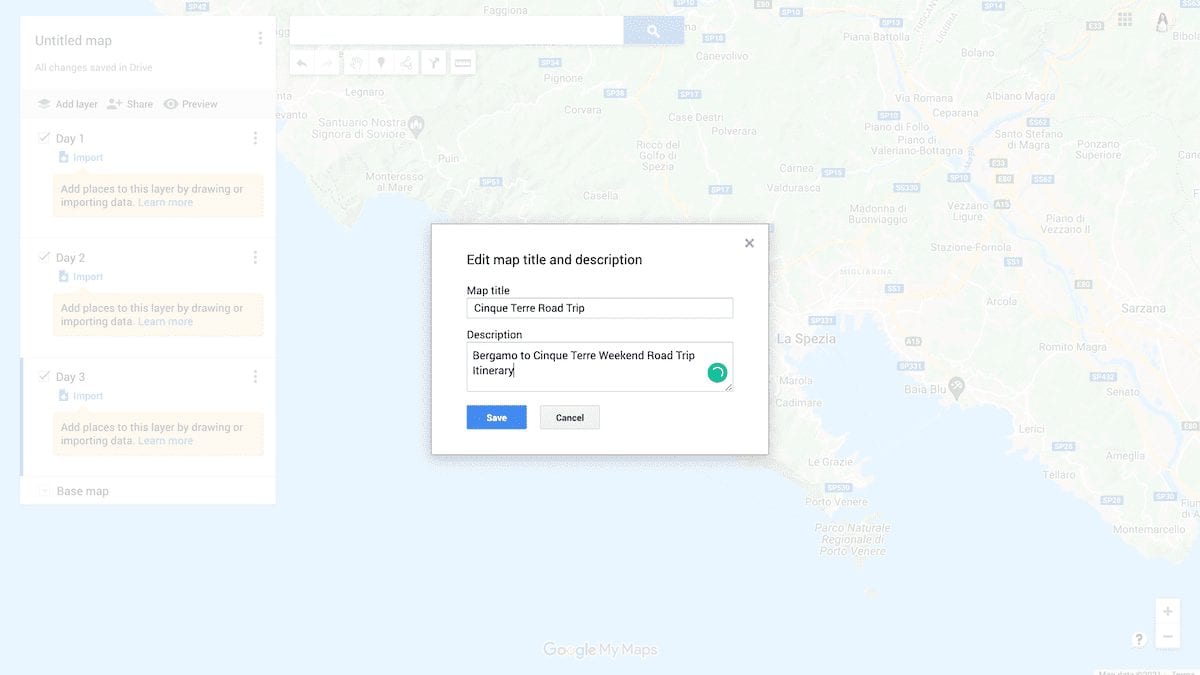
The first step in creating your map is to go to Google Maps Road Trip Planner, click Create New Map, and give it a name. You can also give it a description (which is especially helpful if you plan to make it public or are sharing it with others.) You’ll find where you can name the map in the upper lefthand corner of the screen.
The next step is to start adding locations! Type in the search or click in a place on the map to create a marker for a location. If you type your location in, remember to click “Add to Map” in the bottom lefthand corner of the popup.
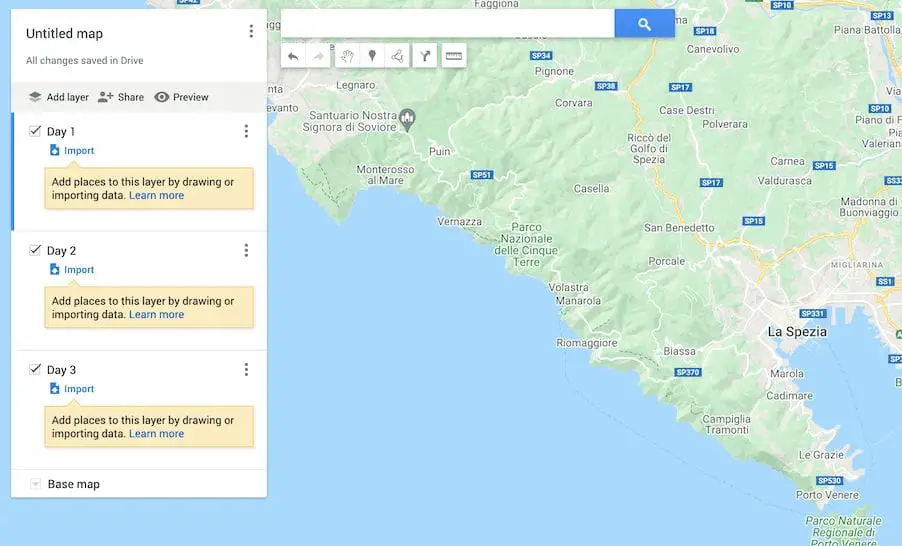
How to Add Layers in Your Map
You can easily add layers to your map in Google Maps Trip Planner by clicking “Add Layer” in the upper lefthand corner of the navigation panel. Each layer is divided as a box in the navigation panel.
When working with different layers, be sure the layer you want to add or make changes too has a blue line on the side of its box. If there is no blue line, you’re changing a different layer.
How to Color Code or Add Symbols to Your Location Markers

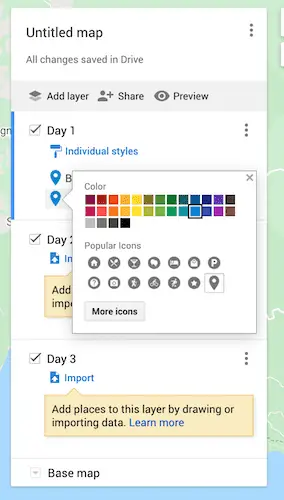
To categorize your location markers, you can either group them by different colors or attach a symbol to them.
To give them a new color, scroll over the location and click on the paint bucket that appears to the right of the location name. You’ll then be able to select a color for your marker!
In the same popup panel, you can transform your marker into a symbol, like P for parking, a camera for a photo location, a fork and knife for a restaurant, and many more specific options to choose from!
How to Add Directions to Your Map
To add direction between locations, create a new layer. Click the icon below the search bar that has the symbol of an arrow turning right and then input the locations you need directions between.
You can also click on a location marker and hit the same symbol at the bottom righthand corner of the popup to get directions.
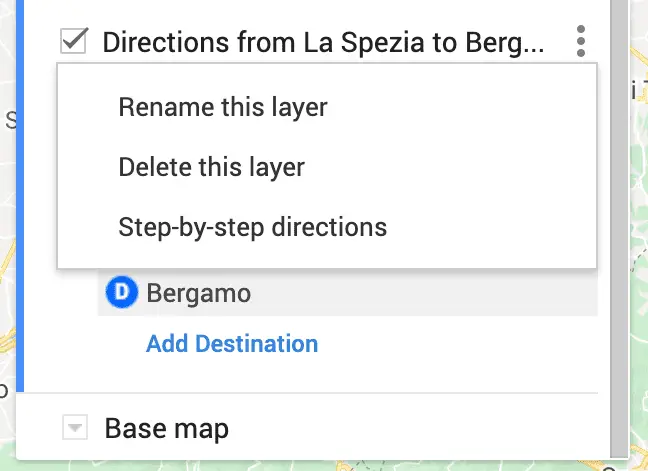
Access step-by-step directions by clicking on the three dots in that layer and then selecting “Step-By-Step Directions.” It takes into account real-time traffic to give you accurate travel times and also notifies you if you will be passing through tolls!
Pro Tip: Because you add directions to a whole new layer, you can easily turn the other layers off just to see your driving route. This is an awesome feature of Google Trips Planner, since you can pick and choose which location markers you are driving between!
How to Share Your Map

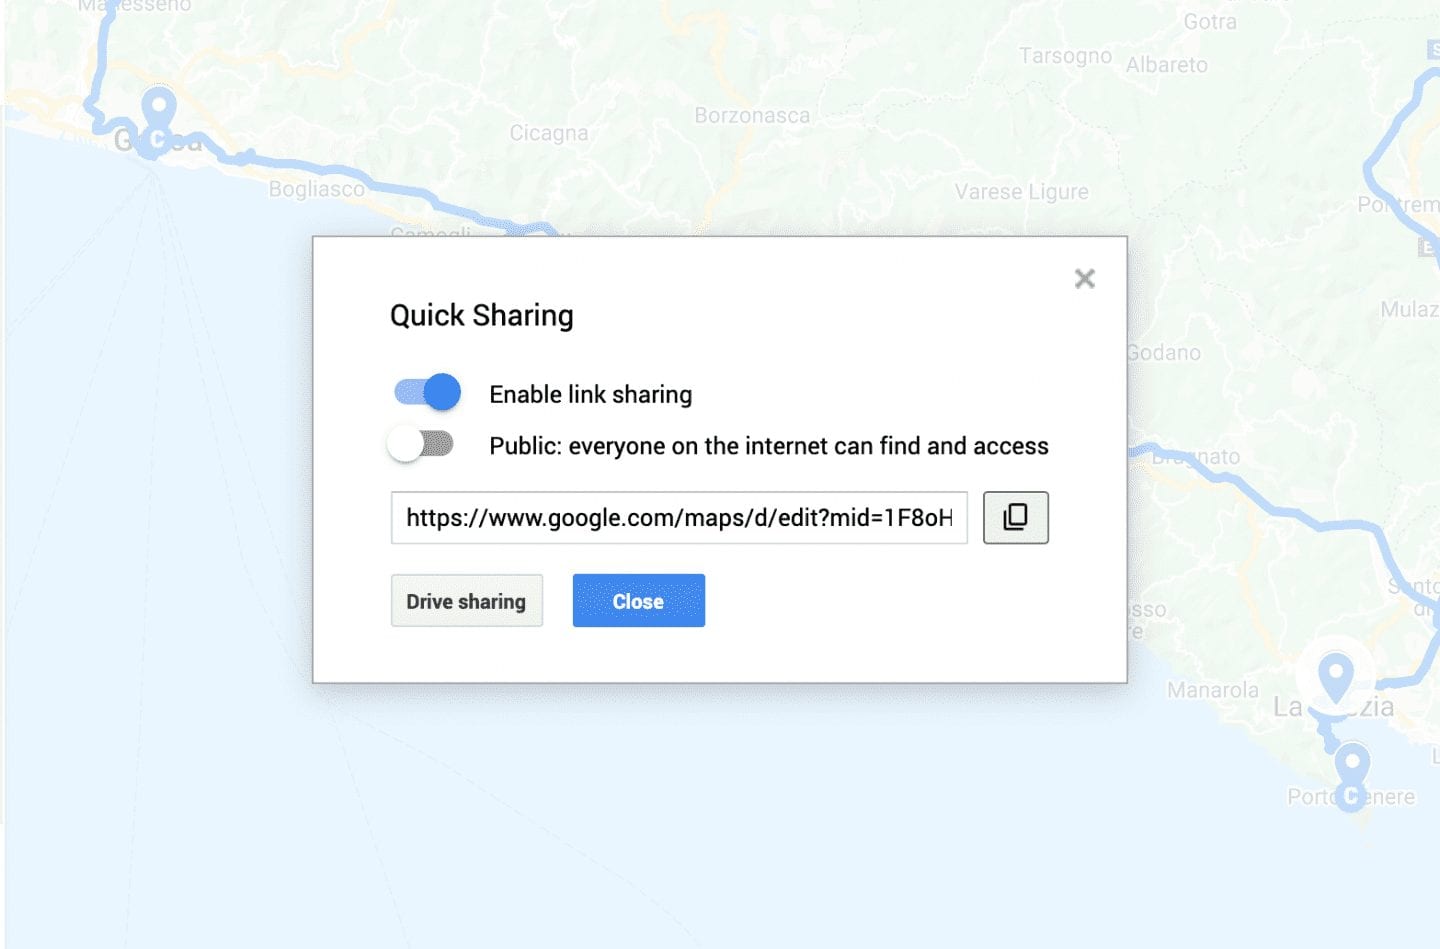
Congrats! You made your map! Now you can share it with your fellow trip-goers or with the world in two easy steps!
First, click Share at the top of the navigation panel. In the popup, you can choose to share privately with others using the URL or make the map public for anyone to search, not using the URL.
If you don’t want users to be able to edit the map that you share with them, click “Drive Sharing” and make sure the link permissions are set to “Viewer.”
Extra Tips for Using Google Maps Trip Planner
- Google has their own articles related to using Trip Planner. They are more technical but can be helpful when needing clear step-by-step instructions on how to do something.
- As much as I love using this online tool, I still love to make my lists. I always write down trip plans in my travel journal (I’m obsessed with the WANDRD brand, as you’ll know if you are a regular reader,) which is also a great place to write reflections of my travels in!
I hope you found this guide to Google Maps Trip Planner helpful for planning your next getaway itinerary!
Any questions on using Trip Planner? Are you surprised by any of its features? Let me know in a comment!
Save these tips for easy reference on Pinterest!
Happy trip planning!
XOXO
Michela